5.4 Introducing the Abacus
On this page
- Introduction – Traffic Light
- Getting Started with the Abacus
- Use of Colours
- Similarities and Differences between Practice Period and Introducing the Abacus
- Preparing to Introduce the Abacus
- Introducing the Abacus
6.1 Differences Approaches to Teaching - Repeating the Use of the Abacus
- Pitfall with Abacus
- Summary: Introducing the Abacus
- Credits
After the Practice Period, teachers introduce the Abacus in a subsequent phase. This allows them to address pupils as a group, per lesson, with regard to behaviour. As during the Practice Period, pupils continue to be addressed individually, per period, regarding behaviour and effort.
Once I have gained experience with ‘Gestures‘, ‘Tips‘, and the ‘Future Behaviour Letter‘, I consider introducing the ‘Abacus‘. The ‘Abacus‘ helps me to reduce disruptions by counting the number of ‘Tips‘ per lesson. When the agreed maximum is reached during whole-class teaching, I ask a pupil to write a letter, even if that pupil has not previously received a ‘Tip‘.
Introduction video
For more information, please see our other introductory videos here.
1. Introduction – Traffic Light
FFT presents the three steps used to address pupils on behaviour (maintaining order) — Non-verbal, Verbal, and Measure — as proposals within Behaviour Management Strategies. Each step can be implemented in different ways. Introducing the Abacus is an extension of the working method used during the ‘Practice Period’.
With the ‘Abacus’, you limit the number of ‘Tips’ per lesson. FFT recommends a maximum of two ‘Tips’ per lesson during whole-class teaching and four ‘Tips’ per lesson during independent work. Decide for yourself whether these numbers are appropriate for your context.
Using the ‘Abacus’, you count ‘Tips’ per lesson during both whole-class teaching and independent work. By showing pupils the images of the ‘Abacus’, you address the group as a whole regarding behaviour and commitment. The images clearly show how many ‘Tips’ have been given to the group in total during that lesson. Use this powerpoint to print or alter these images.
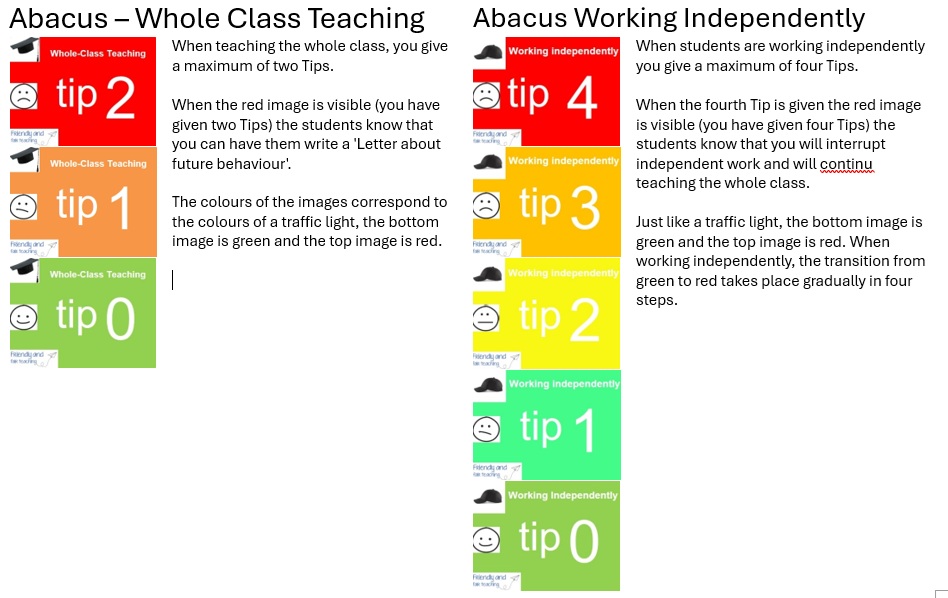
Figure 97: all Counting Frame images
With the Counting Frame you:
- reduce the number of disruptions per lesson;
- address the whole group, per lesson, regarding behaviour and effort;
- clearly indicate your professional boundary during both whole-class teaching and independent work.
2. Getting Started with the Abacus
With the ‘Abacus’, you introduce the sixth and final component of Behaviour Management Strategies. FFT advises starting with the ‘Abacus’ only if you have:
- had positive experiences with the ‘Future Behaviour Letter’ (a pupil has written the letter, submitted it, and the task had a positive effect on behaviour);
- gained positive experience in giving and recording Tips;
- noticed that pupils respond well to your Gestures.
3. Use of Colours
When counting ‘Tips’ with the ‘Abacus’, pupils always see a different image in a different colour (see image above). The colour changes from green to red, just like a traffic light. At the start of a new lesson, the colour returns to green. See credits.
With this approach, the letters you ask pupils to write during whole-class teaching are printed on different coloured paper: yellow and red. These colours therefore resemble the colours of the cards that a football referee uses when a foul is committed.
4. Similarities and Differences between Practice Period and Introducing the Abacus
Across two periods of eight lessons, you introduce Behaviour Management Strategies. Below are the similarities and differences between the ‘Practice Period’ and ‘Introducing the Abacus’
Similarities
- The ‘Framework’ is displayed on the wall and the ‘Triangle’ is used.
- You use two lists: one for whole-class teaching and one for working independently.
- You first address pupils on behaviour or effort non-verbally, and then verbally.
- During whole-class teaching, you keep your ‘Tip Book’ to hand, with the blue ‘Triangle’ image on the back.
- During independent work, you keep the working independently list on a clipboard, with the green ‘Triangle’ image on the back.
- The first two times you address a pupil regarding behaviour or effort, you give a ‘Tip’. The third time within a period, you ask the pupil to write a ‘Future Behaviour Letter’.
- ‘Tips’ are counted per period. ‘Tips’ from the previous period expire; each pupil starts each new period with a clean slate.
Differences
- Introducing the ‘Abacus’ reduces lesson disruptions and improves pupils’ working attitude.
- With the ‘Abacus’, you indicate your boundary earlier and move more quickly to assigning a ‘Future Behaviour Letter’.
- Pupils are given less space to persist in inappropriate behaviour or insufficient effort.
- The ‘Future Behaviour Letter’ is printed on three colours of paper: yellow, orange, and white. The colour shows when and in which context the letter was issued (red paper is avoided because the text is difficult to read).
- During independent work, letters are printed on white paper.
- During whole-class teaching, the first letter is printed on yellow paper; if necessary, a second letter is printed on orange paper, after which pupils are asked to work in silence.
At this stage, consider adding an additional question to the ‘Future Behaviour Letter’:
“Do you have a ‘Tip’ — positive advice — for the teacher?”
This gives pupils the opportunity to express how they experience being addressed and makes the process more balanced.
(Download the letter with the additional question.)
5. Preparing to Introduce the Abacus
- Print two new class lists for recording Tips: one for whole-class teaching and one for working independently.
- Print the ‘Future Behaviour Letter’ on yellow and orange paper (for whole-class teaching) and on white paper (for independent work).
The colour allows you to see whether the letter was assigned during whole-class teaching or independent work or during whole-class teaching, at which phase of the lesson the letter was assigned.
The colour coding of the ‘Future Behaviour Letter’ supports your administration and gains meaning for pupils without further explanation. You keep these letters and can later remind a pupil of a commitment formulated in the letter. From the moment the ‘Abacus’ is introduced, the colour of the letter indicates the situation in which the pupil wrote it.
- Continue to use the ‘Triangle’ (Managing Expectations) and the ‘Framework’.
- Create a ‘Abacus’ using a display folder with a triangular stand. Insert the images showing the number of Tips given. These images can be printed using the provided PowerPoint.

Figure: Counting Frame
6. Introducing the Abacus
You may show parts of the introductory video to pupils to explain how the ‘Abacus’ will be used. The “red letter” mentioned in the video is, in practice, printed on orange paper, as red paper makes the text difficult to read.
You may also explain this information directly to pupils using the guidance below.
Instructions for pupils
You explain to pupils that the ‘Abacus’ introduces a second, additional boundary:
- The first boundary is already familiar: it is determined by the two lists (whole-class teaching and independent work) on which ‘Tips’ are recorded per period.
- The second boundary is set using the ‘Abacus’: a fixed number of ‘Tips’ per lesson — two during whole-class teaching and four during independent work.
You explain what actions follow once the ‘Abacus’ reaches red and you still need to address a pupil’s behaviour or effort.
- During whole-class teaching, the image turns red after the second ‘Tip’. The next pupil is asked to write a ‘Future Behaviour Letter’ printed on yellow paper; the following pupil is given a letter printed on orange paper. The colour indicates when the letter was issued during the lesson.
- During independent work, the image turns red after the fourth Tip. You then stop independent work and continue with whole-class teaching. In this situation, no letter is assigned.
Red image – your boundary
By showing the red image of the ‘Abacus’, you clearly indicate your boundary and create calm and predictability. Pupils understand that there is no longer room for disruption. The actions that follow differ between whole-class teaching and independent work.
6.1 Differences Approaches to Teaching
Teacher-Centred Education
The quality of whole-class teaching decreases when many pupils disrupt the lesson or do not get to work. Therefore, tell your pupils that during whole-class teaching you will give a maximum of two ‘Tips’ to the group per lesson and that after the second ‘Tip’ you will ask a pupil to write a ‘Future behaviour Letter’. Show pupils that with each ‘Tip’ the ‘colour’ of the ‘Abacus’ changes. Every pupil can then see when your boundary has been reached: the image on the ‘Abacus’ turns red. When the red image is visible, any pupil may be asked to write a ‘Future Behaviour Letter’, including a pupil who has never received a ‘Tip’.
By limiting yourself to two ‘Tips’ during whole-class teaching, you avoid wasting time by endlessly giving ‘Tips’. See third Pitfall.
If no ‘Tips’ have yet been given, the ‘Abacus’ is set to green. During whole-class teaching the ‘Abacus’ changes colour twice:
- from green to orange (pupil 1 who disrupts or does not get to work);
- from orange to red (pupil 2 who disrupts or does not get to work).
With the red image of the ‘Abacus’ you make your boundary clear. Pupils will then be more careful not to disrupt the lesson or fail to participate in activities.
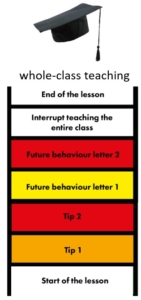
Image 98: Abacus – whole-class teaching
In practice, you will usually give fewer than two ‘Tips’ per lesson.
In practice, you will only occasionally ask a pupil to write a ‘Future Behaviour Letter’.
Actions during whole-class teaching (after Tip 2)
- The third pupil you address receives a letter printed on yellow paper.
- The fourth pupil receives a letter printed on orange paper. After issuing the orange letter, you interrupt the lesson. This happens only occasionally and prevents further escalation. The orange letter marks your professional boundary.
After the second letter, you ask all pupils to work silently on homework, preventing further letters from being issued.
Note: A pupil who receives the orange letter remains in the lesson. You clearly state that all pupils are expected to work silently. If a pupil does not comply, they are seated separately. Only when there is no space left to separate pupils do you remove a pupil from the lesson (see exceptions regarding removal).
Student-Centred Education
If four pupils each disturb another pupil or do not get to work, eight pupils are already involved in the unrest. When pupils see the red image, it is too noisy to work effectively. You then interrupt independent work and return to whole-class teaching. This prevents you from giving too many ‘Tips’ during independent work. See this fourth Pitfall.
Pupils who work well independently and therefore spend less time on homework at home will come to see independent work as a privilege. During independent work they can already work on their homework or other self-chosen tasks and follow their own learning path. In addition, at school they can consult you or other pupils, which is not possible at home. Discuss these advantages with your pupils.
With the ‘Abacus’ you ensure that pupils can work in a focused way and that you have time to support individual pupils. By counting ‘Tips’ per lesson with the ‘Abacus’ during independent work, pupils can see how many ‘Tips’ (positive pieces of advice) you have already given. If the group wishes to continue working independently, they must stay within the margin of three ‘Tips’.
If you have not yet given a ‘Tip’ in this lesson, the ‘Abacus’ is set to green. During independent work the ‘Abacus’ changes colour four times:
- green to light green (pupil 1 who disturbs another pupil or does not get to work);
- light green to yellow (pupil 2 who disturbs another pupil or does not get to work);
- yellow to orange (pupil 3 who disturbs another pupil or does not get to work);
- orange to red (pupil 4 who disturbs another pupil or does not get to work).
With the red colour of the Abacus during independent work you indicate:
“I have now given four Tips; it is too noisy to continue working independently. There is too much unrest for you to concentrate properly.”
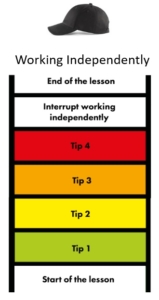
Image 99: Abacus – independent work
In practice, you will usually give fewer than four ‘Tips’ per lesson.
In practice, you will only occasionally ask a pupil to write a ‘Future Behaviour Letter’.
Action after Tip 4
- Independent work is effective only when pupils are focused and not disturbing others. ‘Tips’ remind pupils of this expectation. A pupil who receives a third ‘Tip’ within a period is given a letter printed on white paper.
- After the fourth Tip, you stop independent work. The ‘Abacus’ indicates that there are too many disruptions for effective concentration. Pupils tidy away their independent-work materials and you continue with whole-class teaching. Without this change, pupils would waste learning time. This switch supports both pupils who were working well and those who were disrupting, as you re-engage everyone during whole-class teaching.
7. Repeating the Use of the Abacus
When all six components of Behaviour Management Strategies have been introduced and you begin working with a new group that already knows the approach, you remind pupils at the start of the ‘Framework’ (Perspective: Establisching a Friendly Tone). Using the ‘Triangle’ (Perspective: Establishing Fairness) you clarify expectations.
From the very first lesson, you count ‘Tips‘ in two ways:
- You print two lists per group: one for whole-class teaching and one for independent work.
- You address pupils individually regarding behaviour and effort, recording Tips per period. If a pupil exceeds the maximum of two ‘Tips’ per period, they write a ‘Future Behaviour Letter’.
- You address the group by counting ‘Tips’ per lesson using the ‘Abacus’, during both whole-class teaching and independent work.
8. Pitfall with Abacus
A pitfall is described below. First, a short description is given, followed by what happens as a result of the pitfall. Then it is explained why the pitfall is counterproductive, and finally the VOH advice is provided.
Pitfall – You use the Abacus as the only limitation of Tips
- The only limitation you place on pupils is that (by using the ‘Abacus‘), during whole-class teaching, you give no more than two ‘Tips‘ per lesson to the whole group.
A pupil can then choose to repeatedly and without consequence take either the first or second ‘Tip‘. After receiving a ‘Tip‘, the pupil behaves appropriately for the rest of the lesson. In doing so, this pupil increases the likelihood that another pupil will have to write a ‘Future Behaviour Letter‘. - If you do not record ‘Tips‘ on lists per period, you give certain pupils the opportunity to disrupt the lesson at the start of every lesson without consequences. Because this disadvantages other pupils, it can be regarded as a form of bullying. That pupils are able to bully others in this way is a direct result of not recording ‘Tips‘ per period.
- FFT advice: During whole-class teaching, also record Tips per period.
9. Summary: Introducing the Abacus
With the ‘Abacus’, you count ‘Tips’ per lesson and clearly encourage pupils to behave appropriately and apply themselves. The ‘Abacus’ reduces disruptions and improves lesson flow. Because opportunities to disrupt are further limited per lesson, pupils are less likely to test boundaries in order to avoid the ‘Future Behaviour Letter’.
Using the ‘Abacus‘ during both whole-class teaching and independent work creates calm and predictability. Pupils are addressed regarding behaviour and effort in a clear, professional, and consistent manner, demonstrating effective and respectful classroom management.
10. Credits
Kees de Heus – Former teacher trainer in geography.
Kees develops assessment questions and exams for higher professional education. He told Johan ’t Hart about the use of traffic-light colours in primary education. FFT adopted this idea by creating an Abacus using traffic-light colours.
Maurits de Lange – Jazz pianist and music teacher
When pupils work independently, FFT advises teachers to give a maximum of four ‘Tips’. Maurits adopted this idea from FFT and explained that he used a gradual colour transition when giving ‘Tips’. FFT adopted this idea as well. On the ‘Abacus‘, during independent work, the colour of the images gradually changes from green to red: green, light green, yellow, orange, red.

