5.3 Practice Period
On This Page
- Determining the Length of a Period
- Instructional Video Practice Period
- Introducing Friendly and Fair Teaching
3.1 Preparing for Lesson 1 of the Practice Period
3.2 Introduction in Lesson 1 the Triangle, Framework and Future Behaviour Letter (Next Step)
3.3 Preparing for Lesson 2 of the Practice Period
3.4 Introduction in Lesson 2 of Tips (First Steps)
3.5 Preparing for Lesson 3 of the Practice Period
3.6 Introducing in Lesson 3 Series of Gestures (First Steps)
3.7 Preparation Lessons 4-8
3.8 Lessons 4-8 – Continue Using Series of Gestures, Tips and Future Behaviour Letter - Taking Over a Lesson From a Colleague
- Interfaces Practice Period and Existing Educational Practice
- Repeating Friendly and Fair Teaching in the Next Period
- Introducing the Abacus in a Next Period
- Summary Practice Period
- Credits
Friendly and Fair Teaching (FFT) is a method for teachers that helps them to establish and maintain order in the classroom. Through a series of eight lessons, they create a positive learning environment.
I introduce Friendly and Fair Teaching to my students as a cohesive method during the ‘Practice Period‘, which consists of a series of eight lessons. Before each lesson in this period, I read the accompanying instructions.
Introduction Video
For more information, please see our other introductory videos here.
Introduction
The three steps of Behaviour Management Strategies are: Non-verbal, Verbal, and Measure. FFT presents these steps as suggestions. Each step can be carried out in different ways. The following guide should therefore be seen as a framework, which you can adapt to your own practice.
Before starting with FFT, you already have an idea of how you want your lessons to run in future: friendly and Fair (Framework). You also have an idea of what you expect from pupils’ behaviour for each form of classroom activity (Triangle). With ‘Behaviour Management Strategies’, you ensure that pupils demonstrate behaviour and effort that meet your expectations.
How do you reinforce positive behaviour with the FFTmethod? (Behaviour Management Strategies)

First, you address a pupil’s behaviour or effort using series of non-verbal ‘Gestures’. You do not keep any record of these. These ‘Gestures’ help pupils to behave appropriately or to improve their level of effort.

You reinforce this effect by giving a small number of ‘Tips’ to pupils who do not respond well to the ‘Gestures’. Within a sequence of eight lessons (Period), you give each pupil some leeway to make mistakes: during that period you address a pupil’s behaviour or effort verbally with two ‘Tips’ that do not cost the pupil any time.

If a pupil does not respond appropriately to the second ‘Tip’, you ask them to write you a ‘Future Behaviour Letter’ (Action). This task is effective because writing the letter takes the pupil time, and because the letter requires the pupil to think along with you in finding a solution.
Introducing the three steps to your pupils
You introduce the three steps of ‘Behaviour Management Strategies’ in reverse order. This way, pupils know from the very first lesson which action you have available. They will naturally try to avoid this action because it costs them time. With Steps 1 and 2 you prevent having to use the letter frequently (a buffer).
- In lesson 1, you introduce the ‘Future Behaviour Letter’, the third step of ‘Behaviour Management Strategies’.
With this letter you address a pupil’s behaviour or effort. You explain:
– when you ask a pupil to write you a letter,
– when they hand it in,
– that they write the letter outside the lesson (the consequence is only effective if it costs the pupil time). - In lesson 2, you introduce giving a ‘Tip’, the second step of ‘Behaviour Management Strategies’.
With a ‘Tip’ (a positive piece of advice) you address a pupil verbally about their behaviour or effort. If, after two ‘Tips’, a pupil still needs to be addressed again about their behaviour or effort, you ask them to write you a ‘Future Behaviour Letter’. With ‘Tips’, pupils know that within a ‘Period’ they have a clearly defined margin within which they can make mistakes. - In lesson 3, you introduce using a ‘Gestures’, the first step of ‘Behaviour Management Strategies’.
‘Gestures’ have the advantage of being silent (non-verbal). When you address a pupil with ‘Gestures’ and the pupil responds well, it costs you very little energy and disrupts the lesson as little as possible. Unlike Tips, you do not keep a record of ‘Gestures’. Another advantage of ‘Gestures’ is that you do not need to make a correcting remark aloud. In practice, you will find that in most cases a pupil can be asked to adjust their behaviour or effort with a simple gesture.
From lesson 3 onwards, you always start with ‘Gestures’, then ‘Tips’, and only then a ‘Future Behaviour Letter’. This order remains in place after the third lesson.
This illustration shows how you introduce the three steps:
in lesson 1 step 3 (Letter), in lesson 2 steps 2+3 (Tips → Letter), and from lesson 3 onwards steps 1+2+3 (Gestures → Tips → Letter).
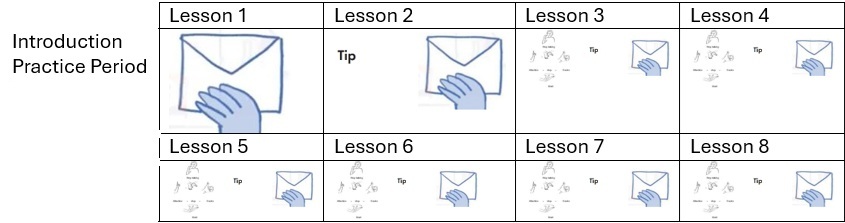
Figure: Introduction Practice Period
With the ‘Gestures’ and ‘Tips’ that you introduce in lessons 2 and 3, you ensure that you:
- need to use the ‘Future Behaviour Letter’ as little as possible;
- always use the letter according to plan after two Prompts (and not impulsively out of anger);
- give pupils some leeway (they are children — things can go wrong, and they naturally explore boundaries).
1. Determining the Length of a Period
When you begin working with Behaviour Management Strategies, you decide on the length of a Period in which you will record ‘Tips’. During that Period, you note ‘Tips’ on two lists: one for whole-class teaching and one for independent work. The length of the Period depends on how many lessons you teach the pupils each week. Choose whichever duration is most suitable for your situation:
- A secondary teacher who teaches one hour per week might choose a Period of eight weeks (containing eight lessons).
- A secondary teacher who teaches two hours per week may shorten that Period to four weeks (containing eight lessons).
- A primary teacher can — depending on the pupils’ age — work with Periods of one day, half a week, or a full week.
- A teaching assistant works with different classes. The number of hours per week per class differs. Sometimes you co-teach with a teacher; at other times you lead the class on your own.
The recommendation for a teaching assistant who works together with a teacher:
– follow and support the teacher’s classroom-management approach.
– ask the teacher if you can experiment with Friendly And Fair Teaching.
– If it is succesfull, you might consider working together with the teacher with one shared set of lists per group.
The recommendation for a teachin assistant who words independently:
– print two lists per group, just like teachers do (one for whole-class teaching and one for independent work).
– write each lesson the date at the top of the relevant list. Once you have written eight dates on a list, a Period for that class is complete.
Depending on how often you see the class, you will reach lesson eight more quickly with some groups than with others. After the eighth lesson, you start again with new lists for whole-class teaching and independent work.
The instructional video below explains how to determine the length of a Period.
2. Instruction Video Practice Period
The first part of this video is intended for the teacher. It is followed by three sections that you can show to your pupils during the first three lessons of the Practice Period. With these three sections you introduce:
- the ‘Future Behaviour Letter‘ in lesson 1 (Next step – Behaviour Manangement Strategies).
- Verbal ‘Tips‘ in lesson 2 (First Steps – Behaviour Management Strategies).
- Non-verbal ‘Gestures‘ in lesson 3 (First Steps – Behaviour Management Strategies).
You can also choose to convey the information from this video to your pupils yourself.
3. Introducing Friendly and Fair Teaching
In eight lessons, you introduce Friendly and Fair Teaching. The outline below explains how to prepare for each lesson and how to inform your pupils about this new way of working. You introduce the three steps of Behaviour Management Strategies during the first three lessons of the Practice Period. How do you prepare for this, and how do you introduce each step?
What follows are six sections, grouped in pairs. In each pair, the first section focuses on preparation, and the second describes how to introduce that particular step to your pupils. The final two sections explain how to continue applying this approach during the remaining five lessons.
3.1 Preparation
lesson 1
3.2 Introduction
lesson 1
3.3
Preparation
lesson 2
3.4
Introduction
lesson 2
3.5
Preparation
lesson 3
3.6
Introduction
lesson 3
Guidance for the final five lessons of the ‘Practice Period’, in which you always use the three steps in the following order:
‘Gestures’ > ‘Tips’ > ‘Future Behaviour Letter’.
You continue to follow this approach in all subsequent periods.
3.7
Preparation
3.8
Continuation
3.1 Preparing for Lesson 1 of the Practice Period
- Print several copies of the ‘Future Behaviour Letter‘, preferably on yellow paper. In Lesson 1 you will use no more than two letters per group.
- Buy a small notebook and label it ‘Tip Book’. Whenever you ask a pupil to write a letter, record that pupil’s name in this notebook.
- Print the PDF with the Framework and display it on your classroom wall. Its impact increases when pupils encounter this Framework in multiple classrooms.
- Print the A3 PDF on sturdy paper to use as the template for the Triangle. With the Triangle, you indicate whether you are about to begin whole-class teaching or independent work. This helps pupils understand what you expect from them at that moment and which agreements apply to the mode of working you have chosen.
- In the first lesson, show the relevant part of the instructional video (from 1 minute 48 seconds onwards, the video is intended for pupils). If you plan to use this instruction, cue up the correct segment before the lesson begins. You may also present this information to your pupils yourself or adapt it to suit your own preferences.
3.2 Introduction in Lesson one the Triangle, Framework and Future Behaviour Letter (Next Step)
You meet a group for the first time and, whatever their behaviour, you greet them in a friendly manner. If a group enters the classroom in a noisy or restless way, you do not force order. You simply wait calmly until they are ready to be addressed. What should you do if this takes too long?
In that case, write down in your ‘Tip Book’, as an observer, the unacceptable behaviour you see your pupils displaying. If a pupil asks what you are writing, explain that you may discuss what you are noting down later with the class and/or with a senior member of staff.
To request attention, you can also write this general announcement on the board:
“Your attention, please – the lesson is about to begin.”
By responding in this way, you remain friendly and clear from the very start. You show that you will not allow yourself to be provoked into becoming angry or raising your voice when the lesson does not begin as you would like.
If the situation gets completely out of hand, consider stepping out of the classroom for a moment. Pupils will not know what you intend to do — perhaps you are consulting someone from the leadership team. When you return, they will likely be curious about where you went and will give you their attention.
The introduction of the Friendly and Fair Teaching approach begins by showing this overview:
- Today I will introduce the Framework, the Triangle, and the Letter on Future Behaviour.
- The next lesson I will introduce the Tip.
- The third lesson I will introduce Gestures.
Pupils then understand that today’s introduction is part of a broader plan.
Triangle
Next, you show the Triangle, which indicates the type of action you expect from your pupils during whole-class teaching or during independent work.
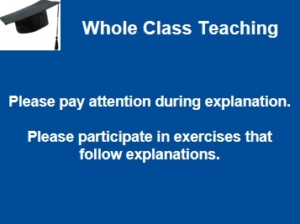
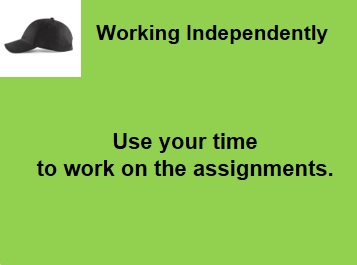
You explain: “In my lessons I distinguish two situations:
- either I teach (Whole Class Teaching) followed by short exercises, class discussion) and then I ask you to pay attention or participate.
- or you work independently on assignments and then I expect you to get to work and not disturb the other students.“
(Show both images one after the other).
“If a student does not follow one of these instructions, I address this student about behaviour and commitment. Because I am now explaining something, I show this blue image: (Whole Class Teaching – Please pay attention during the explanation – Please participate in exercises that follow the explanation). When I explain something from now on, I will show this blue image.”

Figure: framework and triangle
Framework
“As you can see, there is a picture hanging on the wall. The picture says: Friendly + Fair.
I will try to be friendly and fair in all lessons. If I don’t, you can address me about it – in a friendly way. Conversely, if one of you is not friendly or fair, I will address you about it. ‘Friendly and Fair’ therefore applies to all of us and that is why it is fair”.
Future Behaviour Letter
Then you show your students the ‘Future behaviour Letter‘ and indicate that with this letter you address a student about behaviour and commitment. This letter is the action you take to reinforce positive behaviour. In your own words, tell your students the following:
“Suppose a student is not friendly and/or not fair, or does not follow the instructions on the ‘Triangle’ or the ‘Framework’, then I ask this student to write a ‘Future behaviour Letter’ to me (show a letter printed on yellow paper).
In it, I ask you two questions:
- What is the reason for this letter, what happened, what did you do yourself?
- What can you change/improve about your behaviour?
The student to whom I give this assignment writes this letter to me in his/her own time and hands it in to me at an agreed time.
It is also possible that I ask you to write the letter at the end of this day in my presence (as a teacher, you decide what suits you best). I hope that it is not necessary to hand out a letter this lesson”.
That concludes the explanation of step 1, the measure, to your students. If in the first lesson a student does not adhere to the ‘Framework’ or the instructions of the ‘Triangle’, you give this student the assignment to write a ‘Future behaviour Letter‘ to you. Only give the letter if there is a clear violation of the instructions or in the case of provocative behaviour. With the letter you show that you are able to reinforce positive behaviour or commitment. Because writing the letter takes a student time, the effect of the letter is great. In a very busy class, you can hand out a second letter in the first lesson. The advice is not to let more than two students write a letter per lesson. If the class remains restless afterwards, interrupt the lesson. This is not a sign of weakness. You decide that it is too busy to be able to work well in the way you expect from the students.
you can also correct verbally or use gestures in the first lesson in the way you are used to. The idea behind this lesson is that you will be friendly and fair from now on, so the advice is to try to use gestures in a friendly way and to correct in a friendly way. If you do not do this, there is a chance that students will address you about it because you have just given them permission to do so.
Why Do You Start with the Third Step – the Future Behaviour Letter – in the Very First lesson?
Only once pupils understand the effect of the ‘Future Behaviour Letter‘ — and want to avoid receiving one — should you introduce the verbal step in the next lesson: giving ‘Tips‘, which builds in a margin before progressing to having a pupil write a letter.
Summary
- With one of the two images of the ‘Triangle‘, you indicate what action you expect from your students.
- The ‘Framework’ on the wall makes it clear how everyone should treat each other: Friendly + Fair. Once the ‘Framework’ has been discussed, your students know that you will address a student who behaves unfriendly and therefore disrupts the lesson.
- With a ‘Future behaviour Letter‘ you consistently ensure that the instructions of the ‘Framework’ and the ‘Triangle’ are followed.
3.3 Preparing for Lesson 2 of the Practice Period
- Stick a small version of the blue ‘Triangle‘ image on the back of your ‘Tip Book‘. You can show this to a student during face-to-face instruction. This usually prevents you from having to give a ‘Tip‘.
- Print out two class lists for each class: one for ‘Whole Class Teaching’ and one for ‘Working Independently’. If your students are working independently, write individual ‘Tips’ directly on the relevant class list.
- Buy a board with a clip to attach the list for ‘Working Independently’. Print a small version of the green image of the ‘Triangle‘ and stick it on the back of the board. You use this board + list + image during independent work. You can show the image on the back to a student as a way of non-verbally addressing the pupil on behaviour or effort when you walk through the classroom, without this leading to a ‘Tip‘.

- In the second lesson, show the relevant part of the instructional video (from 3 minute 08 seconds onwards, the video is intended for pupils). If you plan to use this instruction, cue up the correct segment before the lesson begins. You may also present this information to your pupils yourself or adapt it to suit your own preferences.

3.4 Introduction in Lesson 2 of Tips (First Steps)
If, in this lesson, a pupil does not behave appropriately or does not put in sufficient effort, you do not have them write a ‘Future Behaviour Letter’. Instead, you first give a ‘Tip’. A ‘Tip’ calls on a pupil to behave better or to apply themselves more effectively. You explain that each pupil may receive two free ‘Tips’ per period (in the second lesson, there are still seven lessons to go until the end of the period). These Tips are “free” in the sense that they do not cost the pupil any time.
- Each Tip you give reduces that pupil’s margin for not behaving properly.
- With ‘Tips’, you clearly state your boundary. If you address the same pupil for a third time within a single period (within the same mode of working — either whole-class teaching or working independently), you then ask that pupil to write a Future Behaviour Letter.
- The ‘Tips‘ act as a buffer that prevents you from having pupils write the ‘Future Behaviour Letter’ too quickly or too often.
- A pupil can avoid having to write a letter by improving their behaviour and applying themselves more effectively.
FFT advises giving a maximum of one ‘Tip‘ per lesson per pupil. If, from the second lesson onwards, you limit yourself to one Tip per pupil per lesson per mode of working (whole-class teaching or working independently), then it will not be until lesson four that a pupil may be asked to write a ‘Future Behaviour Letter’. If you limit yourself in the number of Tips you give, it is important to know what to do when a pupil continues to disrupt the lesson after receiving a Tip.
Note Tips
You give Tips in two modes of working: during whole-class teaching and during working independently.
- During whole-class teaching, you first record ‘Tips’ in your ‘Tip Book‘. You only need to write down the pupil’s name. After your lessons, you transfer the ‘Tips’ you have given onto the whole-class teaching list (you note the date on which you gave the Tip, followed by an indication next to the pupils name). It is not necessary to write down what the pupil did wrong. Recording Tips in your Tip Book appears friendlier than noting them directly on a class list. By transferring the Tips onto the whole-class teaching list afterwards, in your own time, you also reduce the chance of mistakenly recording a Tip against the wrong pupil.
- The illustration on the back of the board holding the working independently list is shown to a pupil non-verbally when you walk through the classroom during independent work and want to address behaviour or effort. In most cases, this prevents the need to give a Tip. If giving a Tip is still necessary, you record it immediately on the independent work list, which is clipped to the board. This method of recording appears more formal, which suits this mode of working. Pupils see that, by keeping this list, you are ensuring order.
In each lesson, you may give a pupil a maximum of two Tips: one during whole-class teaching and one during independent work. However, try to limit yourself to one Tip per pupil per lesson.
With this approach, you delay the use of the letter and ensure that you never ask a pupil to write a ‘Future Behaviour Letter’ impulsively or in anger. This restraint contributes to the success of the method.

Image 94: Tip book and lists to note Tips
For each list, you record a maximum of two Tips per student per period (of eight lessons). The first two ‘Tips’ per list are ‘free’ (do not take the student any time). The third time per list that you have to address a student about their behaviour or effort, you ask this student to write a ‘Future Behaviour Letter’. This letter does take a student time. Not pointless time as with punishment rules, but time spent sensibly on self-reflection and a contribution to a solution.
Each student can receive two ‘Tips’ during ‘Whole Class Teaching’ and two ‘Tips’ during ‘Working Independently’. If you combine the two lists, a student can receive a maximum of four Tips per period of eight lessons with this method of working without you having to impose a measure. Experience shows that only a single student collects four ‘Tips’ within a period. To limit the number of ‘Tips’ you give, try to give a maximum of one ‘Tip’ per student per lesson. This limitation puts a brake on escalation and ensures that you will not quickly ‘punish’ a student out of emotion with damage to the relationship. What to do if a student continues to be disruptive after a ‘Tip’?
If a student on either list exceeds the maximum of two ‘Tips’, you ask this student, without animosity, to write a ‘Future Behaviour Letter’ and to hand it in at a time of your choosing.
Why Do You Start with Tips in the Second Lesson?
By giving ‘Tips’, you ensure that you never ask a student impulsively to write a ‘Future Behavior Letter’. It also eliminates the need for you to get angry.
Lesson 2 Summary
From the second lesson onward, you’ll use “Tips” and the ‘Future Behaviour Letter’ to consistently ensure that students follow the instructions they see in the ‘Framework’ and ‘Triangle‘.
3.5 Preparing for Lesson 3 of the Practice Period
- After lesson 2, copy the ‘Tips’ you wrote in your ‘Tip Book’ onto the ‘class list for whole-class teaching’. Repeat this copying of the Tips from the previous lesson after each subsequent lesson.
- On the page with all the ‘Gestures’, look at the three gestures shown below. There you will also find gestures that help lessons run more smoothly, such as the ‘Silence Gesture’: a gesture you use to ask the whole class for silence.
- In the second lesson, show part of the instructional video above (from 4 minutes and 42 seconds onwards the video is intended for pupils). If you want to use this instruction, prepare this segment before the lesson starts.
3.6 Introducing in Lesson 3 Series of Gestures (First Steps)
By using ‘Gestures’ before you give a ‘Tip’, you make the ‘buffer’ larger in the third lesson. The larger the buffer, the smaller the chance that you will have to ask a pupil to write a ‘Future Behaviour Letter’. Before you instruct a pupil to write a letter to you, you first use ‘Gestures’ and then ‘Tips’.
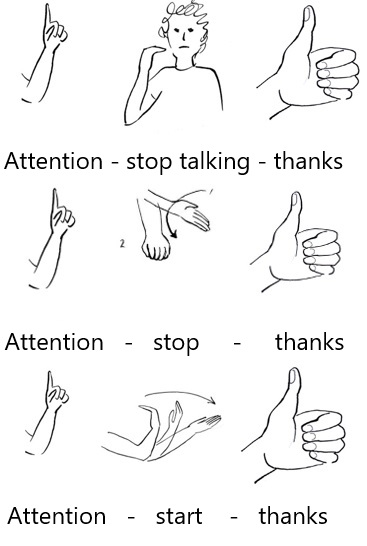
Image 95: three series of gestures
You use the third series of gestures, ‘Attention – start – thanks’, in two situations:
- During whole-class teaching, you use these gestures to prompt a pupil to take part in a whole-class exercise that follows your explanation.
- During independent work, you use this series of gestures to prompt a pupil to start working independently.
From the third lesson of the ‘Practice Period’, and in all subsequent periods, you use the first three steps in the usual order: Gestures > Tips > Future Behaviour Letter (Behaviour management Strategies).
These three steps – in this order – ensure that you usually address pupils’ behaviour or effort using simple, non-disruptive means, without needing to interrupt the lesson and/or ask them to write a letter.
Dare to rely on the fact that using ‘Gestures’ and giving and recording ‘Tips’ will increasingly become part of your standard teaching routines. Pupils will then be used to the idea that “this is how it works with you”.
Why do you only start using ‘Gestures’ in Lesson 3?
Only when pupils know the effect of the ‘Tips’ and want to avoid them does it make sense to introduce these gestures. If you were to start in Lesson 1 or Lesson 2, before pupils know the effect of the ‘Letter about Future Behaviour’, the gestures would achieve nothing. A key advantage of ‘Gestures’ is that you can address pupils’ behaviour and effort without making any sound.
Summary of Lesson 3
With ‘Gestures’, ‘Tips’ and the ‘Future Behaviour Letter’, from the third lesson onwards you consistently ensure that pupils follow the instructions shown in the ‘Framework’ and the ‘Triangle’.
3.7 Preparation Lessons 4-8
- In the second lesson, you started giving ‘Tips’. If you give only one ‘Tip’ per pupil per lesson, it is only in the fourth lesson of the ‘Practice Period’ that a pupil may already have received two ‘Tips’ in lessons two and three. When, while transferring the ‘Tips’ from your ‘Tip Book’ to the ‘class list for whole-class teaching’, you notice that a pupil has already received two ‘Tips’ in the two previous lessons, you write that pupil’s name on the board before the start of the next lesson.
- Prepare a number of copies of the ‘Future Behaviour Letter’, printed on yellow paper, in advance.
3.8 Lessons 4-8 – Continue Using Series of Gestures, Tips and Future Behaviour Letter
Whole-Class Teaching
If, in previous lessons, a pupil has received two ‘Tips’ for whole-class teaching, you write that pupil’s name on the board. You wait for the pupil at the door. If you see a pupil whose name you have written on the board, you say:
“Be careful in this lesson, otherwise I will have to ask you to write a letter.”
If you need to speak to a pupil whose name is on the board about their behaviour or effort, you immediately give that pupil the assignment to write a ‘Future Behaviour Letter’. After that, you write the pupil’s name in your ‘Tip Book’ so that you do not forget that this pupil must also hand in the letter.
Working Independently
If, during independent work, you need to speak to a pupil about behaviour or effort and that pupil has already received two ‘Tips’ in earlier lessons (as shown on the list), you give that pupil the assignment to write you a ‘Future Behaviour Letter’.
Write the date on which you gave the letter in the last column of the list for independent work. When the pupil hands in the letter, record this on the list with a tick.
If a pupil protests, you can say:
“You can accept this task now, otherwise I will have to give you a larger task.”
If you choose this option, prepare a larger task in advance. See also: What to do if a pupil continues to disrupt after a Future Behaviour Letter?
Effect of this Approach
With this approach, you delay the use of the letter by using the buffer of ‘Gestures’ and ‘Tips’. As a result, you will never impulsively or angrily ask a pupil to write a ‘Future Behaviour Letter’. This restraint contributes to the success of this approach.
With this way of working, the ‘Future Behaviour Letter’ is an ultimate measure. The lesson usually runs smoothly because of:
- clear agreements;
- consistent action;
- a friendly approach;
- the use of ‘Gestures’ that minimise disruption to the lesson;
- ‘Tips’ that make it clear to pupils when they can expect to be given a letter, encouraging them to improve their behaviour in order to prevent this.
Summary Lessons 4 to 8
During a period, you consistently record ‘Tips’.
If necessary, you ask a pupil to write a ‘Future Behaviour Letter’.
By using ‘Gestures’, ‘Tips’ and the ‘Future Behaviour Letter’, you consistently ensure that pupils follow the instructions they see in the ‘Framework’ and the ‘Triangle’.
4. Taking Over a Lesson from a Colleague
The pupils you will be teaching are familiar with the Friendly and Fair Teaching approach
If you have experience with this approach and you are covering a lesson for a colleague who works with the FFT approach, ask whether that teacher can send you photos of the list for whole-class teaching and the list for independent work. This allows you to see whether the pupil you are addressing for behaviour or effort should receive a letter straight away. During the lesson, record the‘Tips’ you give in your own ‘Tip Book’. After the lesson, pass these ‘Tips’ on to the teacher you are covering for.
The pupils you will be teaching are not familiar with the Friendly and Fair Teaching approach
If you take over a lesson and the group is not used to working with FFT, use Sections 3.1 and 3.2 above. If it becomes necessary to have a pupil write a ‘Future Behaviour Letter’ to you, make it clear when the pupil must hand in this letter.
If possible, agree in advance with the teacher responsible for the class how the handing-in of the ‘Future Behaviour Letter’ will be handled.
5. Interfaces Practice Period With Existing Educational Practice
Teachers Advise Each Other to Start Strict and then Gradually Loosen the Reins
- During the ‘Practice Period’ you start with the ‘Next Step’ (Future Behaviour Letter) and only afterwards with ‘First Steps’ (Gestures and Tips). If necessary, you already give a pupil the instruction in the very first lesson to write a ‘Future Behaviour Letter’ to you. By doing so, you show that you can resolve a disruption of the lesson without it leading to escalation or conflict.
You begin with Step 3 – the letter – because the letter is the effective core element of the three steps. For some groups it will not be necessary to hand out a letter in the first lesson. Immediately issuing a ‘Future Behaviour Letter’ can be compared to starting strict. - In the second and third lessons you introduce the steps that come before the ‘Future Behaviour Letter’:
Lesson 2: Tip > Letter
Lesson 3: Gestures > Tip > Letter
With these steps that precede the letter, you prevent having pupils write the letter too often, which would reduce the power of the measure. These steps also prevent you from giving the assignment impulsively or out of anger. Because you make pupils write a letter less quickly, this feels like loosening the reins.
In Education it is Common Practice to Give Two Warnings. After That, a Sanction Follows
- During the ‘Practice Period’ you first introduce the ‘Next Step‘ (Future Behaviour Letter) and only afterwards the ‘First Steps’ (Gestures and Tips). From the second lesson onwards you give ‘Tips’, which you count and record on lists. Two ‘Tips’ are free: they do not cost the pupil any time. The third time it is necessary to address a pupil about behaviour or effort, you ask that pupil to write a ‘Future Behaviour Letter’ to you. In practice, most pupils do not receive a ‘Tip’, some receive one ‘Tip’, and only a few pupils receive two ‘Tips’. Of this last group, most pupils will not want to write the letter and will improve their behaviour or commitment to avoid it. The group of pupils who are asked to write a letter remains small; issuing the letter is an exception. Consider how frequently you will use the different steps with which you reinforce positive behaviour.
- As with all education, also with FFT it remains necessary to address pupils about behaviour and effort. The difference is that you do not do this through warnings, but through ‘Tips’. A second difference compared to warnings is that you record these ‘Tips’ per period. This limits the possibility for pupils to repeatedly disrupt the lesson. By recording ‘Tips’, you avoid giving warnings without attaching consequences to them. Without consequences, warnings quickly become less effective.
6. Repeat Friendly and Fair Teaching in the Next Period
After the Practice Period, the three steps have already been explained. You then start directly in lesson 1 with addressing a student on behaviour and commitment with ‘Gestures’ and ‘Tips’. From lesson 3 onwards, it may be necessary to give a pupil the task of writing a ‘Future Behaviour Letter’ to you. You ensure that the pupil takes the measure seriously by making sure that the letter is always handed in.
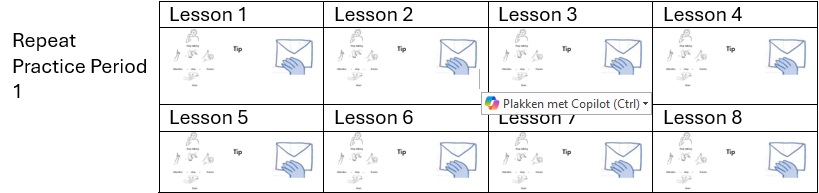
Figure: repeat practice period 1
7. Introducing the Abacus in a Next Period
If you have mastered ‘Behaviour Management Strategies’ and feel that you have to give too many ‘Tips’, and therefore want to move more quickly to issuing the letter, then look at this link: Abacus. With the ‘Abacus’, you add up the ‘Tips’ you give to different pupils and limit the total number of ‘Tips’ per lesson to two during whole-class teaching and four during working independently.
- If you notice that your pupils respond well to ‘Gestures’, ‘Tips’ and the ‘Future Behaviour Letter’, it is recommended to start introducing the ‘Abacus’. From the moment you introduce the ‘Abacus’, you can have the letter written at an earlier stage. This gives your ‘Tips’ more weight and increases their impact.
- From the moment you introduce the ‘Abacus’, you limit the giving of ‘Tips’ in two ways:
– a maximum number of free ‘Tips’ per pupil per period (as in the Practice Period above)
– a maximum number of ‘Tips’ per group per lesson. - By limiting ‘Tips’ both per pupil per period and per group per lesson, you make your boundary clear in two ways.
8. Summary Practice Period
In eight lessons, you introduce ‘Behaviour Management Strategies’ to your pupils by following the lesson-by-lesson guidance of the ‘Practice Period’ (a series of eight lessons). In the first lesson of the ‘Practice Period’, you also introduce the ‘Framework’ and the ‘Triangle’.
At the start of the first three lessons, you introduce a new step of ‘Behaviour management Strategies’ to your pupils each time (lesson 1: Measure/Future Behaviour Letter – lesson 2: Verbal/Tip – lesson 3: Non-verbal/Gestures). During this eight-lesson period, you set a margin for each pupil regarding the number of ‘Tips’. You record these ‘Tips’ per pupil on two separate lists: one for whole-class teaching and one for independent work. The first two ‘Tips’ are free (free in the sense that they do not cost the pupil any time). The third ‘Tip’ (the letter) does cost the pupil time.
With this structured way of working, you ensure that you and your pupils work well together and that a positive learning environment is created.
9. Credits
Michel Couzijn – Teacher trainer UvA
Michel indicated that the five perspectives of Friendly and Fair Teaching: Establishing a Friendly Tone , Establishing Fariness, Planning Lessons, Observing Learning, Behaviour management Strategies, form a coherent whole. In the ‘Practice period’ all perspectives are discussed. That is why we can now rightly speak of the ‘methodology of FFT’.

